Thursday 28 February 2019

A cute Boy's Scrapbook page- with a tag pocket!

A cute Boy's Scrapbook page- with a tag pocket! using fun papers, brightly coloured ribbon, stickers, diecuts and tags, create a wonderful boy's scrapbook page!

Making a fun boy's scrapbook page with removable journalling tags!


This is my second ever scrapbook page, and I decided to get adventurous with it. I really wanted to use the colours yellow, navy and grey, with a pop of red (simply because that is my son's favourite colour!)
I found the back piece of designer paper at My Little Magpie some time ago, and as I had some other projects on the go that utilised the Jillibean Soup paper, and a little left over, I thought that would be perfect to make the tag pocket with!

boy's scrapbook page with removable journalling tags  - Rachel Gillham Art

I decided to keep the photo mat fairly simple, with a thin border of grey and white, because the page was already quite busy! once I was happy with the photo placement, I cut an absolute TONNE of little arrows out from a sizzix thinlets set I have. the little hearts are part of the set, so I dotted those between the arrows too. it is a little hard to see from the photo, but I popped the hearts up on 3d foam pads for some added dimension.


In the bottom left, I used the Jillibean Soup '<3 you' cut file which I cut in two colours- pink and white. I inked the edges and added some gel pen highlights to the heart too.
there really are some amazing cut files from Jillibean, something for everyone, and every occasion which can be found in their spot in the silhouette store

The tag pocket in the right hand corner is really simple-  I just worked out how big I wanted it to be, trimmed the paper in my paper trimmer, and made sure only to tape two sides! 
I do love that arrow paper, and I'm really sad I have used it all now... but also happy to have created some amazing things with it too!

The tags are from my vast collection- the larger ones are from Ranger, and the bottom one is a simple luggage tag I think I picked up from my post office. These got inked, and ribbon threaded through them. I also added some splats of picket fence distress stain on both the tags and the papers, because...why not?

I finished with some banners in the top two corners and some trusty Nuvo Drops following my colour scheme.

My son absolutely loves this page (he's nine now, almost as tall as me, and loves looking at photos from when he was small) and I feel pretty happy with it too!

I'd love to know your thoughts on it as well!


until next time,


Wednesday 27 February 2019

A second Birthday Scrapbooking Page - using up paper scraps

A second Birthday Scrapbooking Page - using up paper scraps- Rachel Gillham Art

A scrapbooking page that uses up your paper scraps- Rachel Gillham Art

A scrapbooking page using up paper scraps!

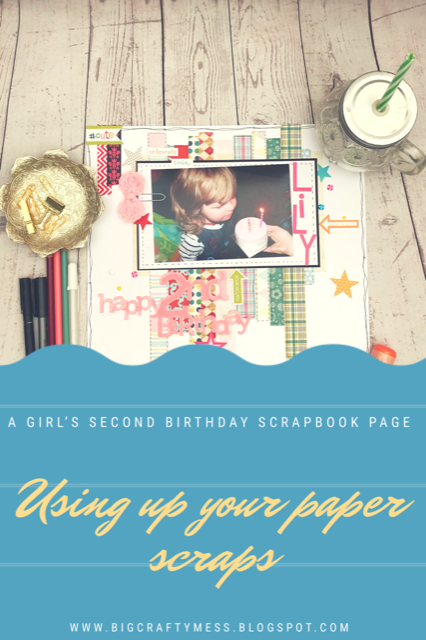
If you have been crafting for a few year like me, I bet you have a nice big pile of paper odds and ends. What better way to use them than incorporating strips of your favourites on a scrapbook page?

this is my very first scrapbook page, so I wanted to start off with a lot of white space- I got a lot more adventurous on my second one (stay tuned as that will be in another blog post soon!)


quite simply- I cut strips from the papers that caught my eye, making them different lengths, and stuck them down over the top of a rectangle of oatmeal coloured paper- leaving the edges of that piece visible. I doodled faux stitching and some solid lines round the edges of the strips- I love a good doodle! created a photo matt and faux stitched around that too, before adding the photo of my daughter blowing out the candles on her second birthday cake.
i added a hand doodled frame around the edge, and some of my favourite washi tape at the corners.

I also added some fun stickers, and some dot embellishments, along with a crocheted bow that I found in my embellies box.

to really finish the page off, I used one of the Jillibean Soup Cut Files 'Happy 2nd Birthday' cut in a pale pink cardstock  below the photo, which I added a layer of glossy accents to. it made it really sparkly and shiny!

I hope you liked my first ever attempt at scrapbooking- I had great fun!


Tuesday 26 February 2019

Chunky Monkey Crafts stamps & Amy Tangerine watercolor resist cards - a sweet card and envelope set

Amy Tangerine watercolor resist cards and Chunky Monkey Crafts stamps- a sweet card and envelope set  Rachel Gillham Art


Playing with Watercolor resist cards , and stamping envelopes!


going waaay back to last year, I bought a load of goodies from Hey Little Magpie during their sale, and the watercolor resist cards by Amy Tan were one of the things I picked up.

I had only used one, and was sat looking at my Chunky Monkey Crafts stamp set a few nights ago, planning what to do next, and they suddenly came to mind as a lovely accompaniment to the stamp I wanted to use on the envelope! (yep, Rachel is working backwards again!!)

I've created a lot of smaller rectangular cards recently, but I used to be more known for using a lot of square six inch cards- so for this project I switched it up and went back to square!


I wanted to keep to a fairly basic colour scheme, and layout and given the choice- always pink and teal. 
the watercolours i used were my beloved kuretake gansai tambis, and 
the papers picked out were from the Fancy Pants Happy place paper pad - the border of the watercolour resist card is part of a sizzix die set that is one of my all time favourites.
I embellished it simply with a few self adhesive epoxy dots, and some garden twine purloined from my husband!

I was contemplating filling the card with heart confetti, too, but i'm still trying to decide whether I do that or not!

The envelope I stamped using the 'sealed with Love' stamp from THIS SET on the Chunky Monkey Crafts Website- it really is a lovely set for those finishing touches, and making sure people are smiling even before they see the handmade card inside!


Even better- you can get 10% off any of the sets of stamps at CMC with the code ' rachelcmc10' !


I hope you have enjoyed this make, and until next time, stay crafty!


Monday 25 February 2019

Sweet Treats- A paper milk carton filled with goodies!


Sweet Treats- A paper milk carton filled with goodies! Rachel Gillham Art


3d paper milk carton - rachel gillham art

A while ago, my friend gave my daughter a lovely little handmade carton full of sweeties- and when it came to a 3d paper project, it was something I decided i'd like to do- especially as I already had a cute cut file from My Scrap Chick for a paper milk carton!

it was really easy to assemble, and instead of decorating it how suggested, I went in with one of my Jillibean Soup double sided designer papers, and some Simple Stories stickers that I have had in my stash for YEARS.

3d paper milk carton - rachel gillham art

I decided to finish the front with one of the clear stamps from the Jillibean Gumball set as it was just a perfect finishing touch!
I also had some cute little heart pegs, and I used this to close the top once full.

the main issue I had was not grazing on the photo props whilst I took the pictures !


Sunday 24 February 2019

Mix the Media - Jillibean Soup mixed media star


Mix the Media - Jillibean Soup mixed media star- Rachel Gillham Art


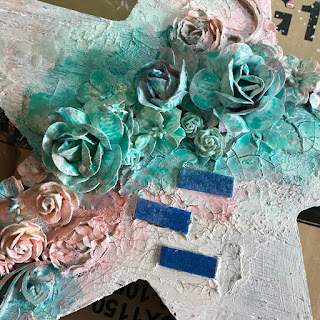
Here's how I turned one of the gorgeous wooden 'mix the media' stars from Jillibean Soup into this mixed media vintage shabby chic style decoration!


Firstly- my star was a little damaged. It was the last one on Amazon, so I opted to fix it instead of sending it back- I was so excited waiting for it, that I knew I could make it work!

I fixed the broken area on the very top point using high density modelling paste, which I slowly built up whilst working on the rest of the star.

you will also have to forgive my work area- I'm currently not set up to do mixed media projects on my desk, and opted instead to work on top of the box the star came in- that way once it is too covered in paint and ink, it can be recycled, and my desk doesn't get damaged!


I firstly created a sketch of what I planned to do, then arranged some of my Wild Orchid Crafts paper flowers , snipped off the wires and glued them down with multi medium matte on top of a strip of cheesecloth.
I chose some of the Jillibean wooden words 'create', 'happiness' and 'today'
and glued those down too. I also added some MDF swirls from Samantha K crafts coming out from the edges of the floral arrangement.

Mix the Media - Jillibean Soup mixed media star- Rachel Gillham Art

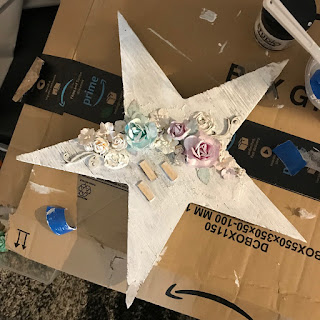
I then started to add gesso to the entire star- starting at the outside and working in - I did it in this order so that the gesso on the outside would be dry when the glue at the centre was dry and ready to be covered too. 

Mix the Media - Jillibean Soup mixed media star- Rachel Gillham Art

I worked my way in, coating all the flowers in gesso too, leaving the wooden words uncovered. later in the process I masked them off to avoid getting spray ink on them.

Mix the Media - Jillibean Soup mixed media star- Rachel Gillham Art

once the gesso was dry, I stencilled some flowers using texture paste and a tim holtz stencil at random areas on the points, and also added crackle paste - again, sporadically, focussed mainly around the flowers , and swiped it on the points randomly- both on the top and the sides.


Mix the Media - Jillibean Soup mixed media star- Rachel Gillham Art

once the crackle paste was dry. the texture was really starting to show!


Mix the Media - Jillibean Soup mixed media star- Rachel Gillham Art

I then pulled out some watered down acrylic paint and one of my distress paints, and dabbed them around the flowers, wiping off most of it just to leave a thin coat.

Mix the Media - Jillibean Soup mixed media star- Rachel Gillham Art

Mix the Media - Jillibean Soup mixed media star- Rachel Gillham Art

I then went in with my prima color bloom sprays in soft teal and cotton candy, making sure to spray it just over the area where the flowers were.

Mix the Media - Jillibean Soup mixed media star- Rachel Gillham Art

Mix the Media - Jillibean Soup mixed media star- Rachel Gillham Art

one of the final steps was to pull out my deco art antiquing cream in antique grey, and coat the areas of the star that were still white. 

Mix the Media - Jillibean Soup mixed media star- Rachel Gillham Art

it looks pretty scary when it is covered, but provides the most wonderful effect once it has dried, and you start to wipe it off. It remains in the cracks and places you don't buff.
as you can see, I wiped it back to leave a lot of  white areas .

Mix the Media - Jillibean Soup mixed media star- Rachel Gillham Art

the very final step was to add creative expressions gold gilding polish to some areas I wanted to highlight- some areas on the flowers, the texture paste flowers, and along all the edges.

Finally, a finished project, and one I am totally in love with!

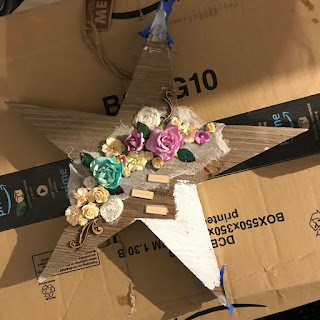
the finished star
Mix the Media - Jillibean Soup mixed media star- Rachel Gillham Art


close up of the centre

Mix the Media - Jillibean Soup mixed media star- Rachel Gillham Art


I hope you enjoyed seeing how I made this mixed media star, and if you have any questions, I'll be happy to answer them!


Tuesday 19 February 2019

envelopes can be fun too! decorated envelope with Chunky Monkey Crafts Stamps


How many of you slave for hours over a beautiful card for a friend or family member, and then just whack it into a plain white envelope that came with your card blanks and call it done?
I’m really guilty of this- I've spent so much time on the card, that I usually run out of time and energy by the time it gets to thinking about envelopes!

However, when I was sent some stamps to work with, from Chunky Monkey Crafts  that were all about the envelopes, I was really excited to take card making to a new level! 

I'm really excited to be working with Dani and her stamps - of which there are a limited quantity left for sale!

For this project, I wanted to make an envelope myself- and remembered that I had previously purchased a square 6” chunky envelope svg file from myscrapchick which would be perfect for what I wanted to do!
Using the ‘sealed with love’ stamp from the ‘sealed with love’ A6 set, I got to work. 
The envelope itself uses 1 sheet of 12x12 paper, and the insert uses part of another. I cut, folded and stuck the envelope, then set to decorating.

Decorated envelope  front Rachel Gillham Art

front of the chunky envelope- complete with diecut banners, and stacked diecut hearts


back of envelope with stamped image- Rachel Gillham Art

back of the envelope, with a diecut pink heart, stamped sentiment and hand cut banner matts

back of chunky envelope showing inside - rachel gillham art

inner of envelope- isn't the owl paper so fun?

I cut a banner around the stamped sentiment, and matted it with some gorgeous turquoise cardstock, before adding a diecut pink heart to the envelope flap. I diecut more hearts and layered them , to be used for the space where you add the name on the front.
I then faux stitched with a fine liner and a white gel pen round the edges of the envelope, and round the banner I created, as I can’t resist doodling on my projects!

all that is left to do is to create a card fit for this envelope! I should probably suggest making the envelope to match your card, and not trying to make a card to fit the envelope!


If you'd like to see the rest of this set, you can follow the link above- and if any of the stamps from CMC catch your eye, you can get 10% off your order with code 'rachelcmc10' - what a bonus!


Saturday 16 February 2019

Making watercolour digital paintings in procreate, with DesignCuts procreate kits


Making watercolour digital paintings in procreate, with DesignCuts procreate kits- Rachel Gillham Art  IHow I can art on the go!

I love to paint, and draw, but sometimes it is really not possible to take my art supplies where I am going- and if the creative muse hits, then i’m stuck, hoping it is still there by the time I can get back home, and also that I remember what it was I wanted to draw, or paint!

When my grandad died a few years ago, I was lucky enough to have been left enough money in his will to buy a second hand ipad pro, and an apple pencil. I really would rather I still had him with us, but I’m very grateful to have been able to buy something that is a daily godsend.

Not only can I keep up with social media, emails and netflix, but I can use the procreate app.
For those of you that haven’t heard about it yet,  It is a totally amazing art app, with no limit to what you can create with it- from lineart, or sketching out ideas, to full blown paintings.
There is also a really handy user manual, which will talk you through every tool that is available in your arsenal, and some brilliant techniques.


 For a galentines gift, one of my dear friends gave me a gift voucher to DesignCuts, which is an amazing resourse website for artists and graphic artists, full of fonts, flatlays, graphics and most importantly (to me anyway) procreate kits created by lots of different amazing artists and creators.

 One of the things I picked out to buy with my voucher  was the watercolor botanical kit, by Wonderbox Creative which includes so many beautiful watercolour brushes, and lots of other amazing design goodies such as textures, photo reference pictures, and colour swatches.

 Me being me, the first piece I created was nothing to do with flowers, but I just wanted to do some free flow play, and get a feel for the brushes included in the kit.


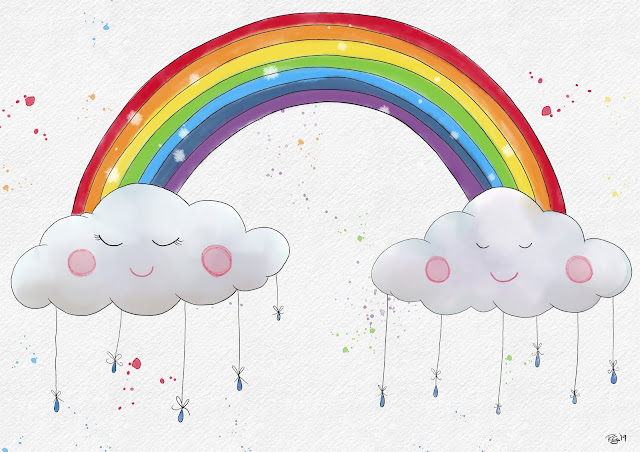
Whimsical clouds and rainbow by Rachel gillham Art


I do love a little whimsy, when I am in the right mood, and I was definitely in the mood for rainbows, and some sleepy clouds. I played with a few of the brushes, including the pencils and ink liners, and backed it onto one of the textures. In my next piece, I had read the PDFs included, and learnt a cool trick on how to get the paper to show through the finished artwork, for a more realistic look- definitely something I will be doing in future works, and may even go back and apply to this artwork.


Today, whilst out at my in laws, I had more time on my hands, and had had the foresight to bring my ipad and my pencil with me - so armed with those, and bundled up in a coat ( it is a really old farmhouse, with wood and coal fired heating, and the fires are all currently unlit) I dove right in to some botanicals, using one of the reference photos provided, watercolour paper textures, colour swatches and brushes  also from the kit, and created this- 

There were actually more flowers in this photo, but I chose to only utilise the top sprig this time.

Floral watercolour by Rachel Gillham Art


Originally I just drew and painted the flower, but one of the techniques i love in card making is to use alcohol inks behind the image, to really make it pop- so I went to a layer behind the flower, blending some purples and lilacs together, with the procreate blending tool had a little play with the salt brush too.

I’m really happy with how it turned out, and have been making plans to go out walking and find some clusters of flowers locally that I can then turn into paintings as well. 


Tomorrow, it is back to my craft area, with projects that need finishing, and a couple of new ones to start. I have so many ideas rushing through my mind, but way too little daylight!

I hope you have enjoyed these paintings, and if digital art is something you are interested in, you really should check out designcuts - their marketplace is full of lots of amazing resources, all with commercial use licenses, and plenty of freebies too!


Until next time, 

Rachel 


Wednesday 13 February 2019

I’m BACK!

Hi everyone, I’m not sure if you remember me! It’s been a long time, but I’m back. I had a slight mishap which involved managing to delete my new blog ( don’t even ask me how I managed to do that one) so I have come back here, instead of starting with a completely blank slate- it’s nice to return to see my old creations, and I’m very excited to share some new ones with you !
Since I was last here, an awful lot has gone on, but a lot has stayed the same. I still remain true to my passion of creating cards, but I have also started painting and drawing again, after a long break.
I published three colouring books the other year with my own original artwork in, gained a love for drawing and painting both physically and digitally on my ipad pro, and also a slight addiction to watching youtube while I work.

Everything else is still the same- I still live in the same place, but we have all just got a little older. My children now love to craft alongside me, and I can’t think of anything better.

The past week has been warmer weather, and the skies a lot brighter  and I’ve really enjoyed being able to craft again in comfort. I thought i’d upload a quick look at what I’ve been doing, before getting back in to posting properly in the coming days. I hope you enjoy them, and Once again, I’m glad to be back with you!


Some Odd Girl stamps are still amongst my favourites, and this gorgeous stamp just begged to be made into a card when I was looking through my stamp storage.


Visible Image stamps are also still a firm favourite, and I tried out a new watercolour technique for the background, which I think is just perfect to go with the sentiment.


I’ve also been playing with white space, and this CAS card was created in minutes! Super easy to do, and still looks beautiful. 

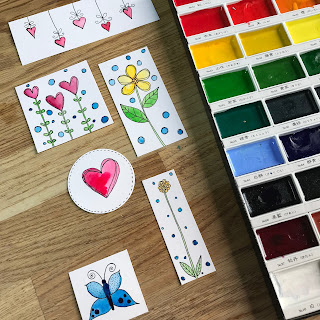
And whilst  my watercolours were out, it seemed a shame not to doodle some images for a set of cards- please stay tuned, the finished cards will be blogged soon!


Most recent post

mailing stickers!

A quick, easy project, to funk up your mailers! if you've been following this blog, you will have seen me using the Chunky Monkey C...