Tuesday 9 April 2019

mailing stickers!

A quick, easy project, to funk up your mailers!


if you've been following this blog, you will have seen me using the Chunky Monkey Crafts stamps for a whole range of things- mostly stamping on envelopes (as this was what they were designed for, anyway!)

Today, I'm changing it up a bit, with a time saving hack - for when you want to add a little extra to your mailers, or envelopes, but just don't have the time to stamp it!

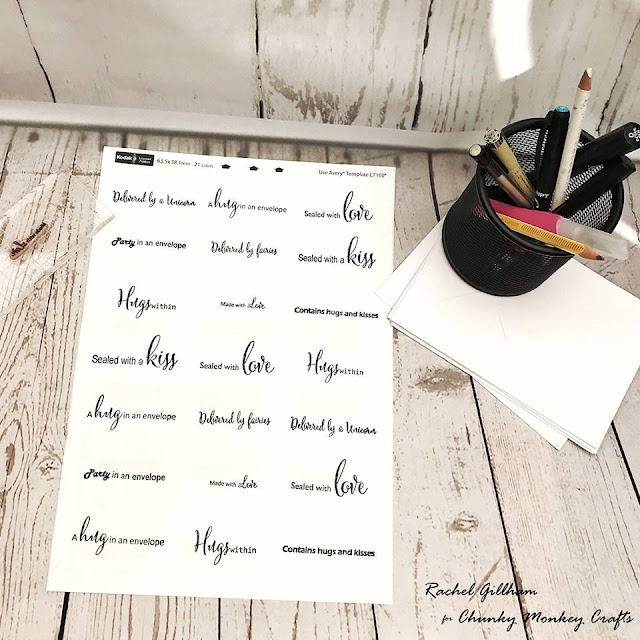
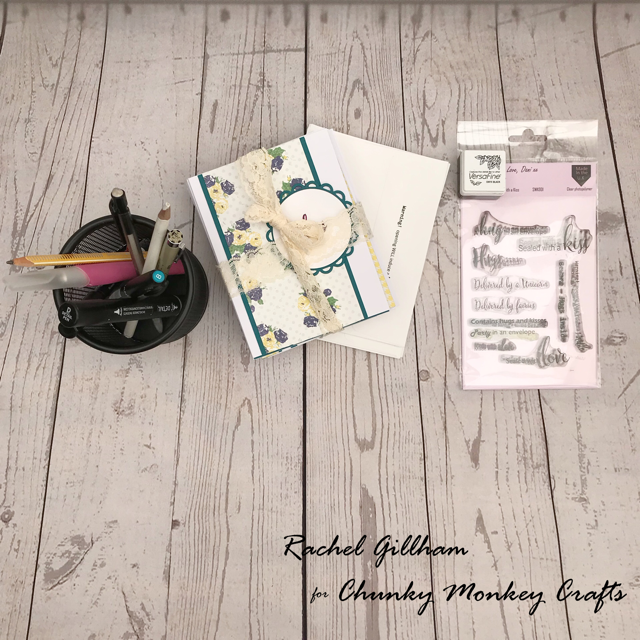
I discovered that all but two of the stamps in the set fit perfectly on these printable address labels I have- so I took a few minutes to stamp them, and now have an entire sheet of labels ready to stick on envelopes whenever I need them!


stamped address labels- Rachel Gillham Art FT Chunky Monkey Crafts stamps

The made with love stickers would also look amazing as part of your packaging for handmade gifts, and crafts !


don't forget you can find this set of stamps and some other awesome sets over on the  Chunky Monkey Crafts website, and if you use code 'rachelcmc10' at checkout, you will also get 10% off!


see you soon!


Tuesday 2 April 2019

Water stamping- a Unicorn card with coordinating Envelope


Unicorns, Distress oxides, and water stamping


There was a good reason for this card being a unicorn- and if you read my last blog post, you will know why!

I've been challenging myself to use all of the 'sealed with a kiss' envelope stamps from Chunky Monkey Crafts, and as of last week, there were only two I hadn't used- the fairy and the unicorn!

my belated fairy card post went up yesterday, and this week, I tackled the unicorn! 

that means that I have now used every single stamp in the set, and shown you some fun project ideas- don't worry, there will be more, I'm not done with them yet!

The fairy card (as mentioned previously) had it's challenges- namely technology being.... not the most helpful, and this one's challenges were in the form of me trying to make whilst I have the flu!

this is actually the second attempt, and apologies- I didn't have the energy to try and video the second make, after I totally messed up the first one, by sneezing at the wrong time!


Visible image unicorn card with Chunky Monkey Crafts envelope stamp- Rachel Gillham Art


 I used a water stamping technique that I learnt whilst watching a tutorial by Jennifer McGuire ink on youtube for the background of the card- I really love learning new ways to do things, and different techniques, and this one was no different!

The pictures don't pick it up, but I added sparkle to the unicorn with a spectrum noir sparkle pen too- as no unicorn is complete without glitter.


Visible image unicorn card with Chunky Monkey Crafts envelope stamp- Rachel Gillham Art

and to change things up a little, instead of stamping my envelope sentiment on the back flap like I usually do, this time I put it on the front!

what is your favourite placement , front or back?


SUPPLIES:

Sealed With A Kiss stamp set from Chunky Monkey Crafts (use code rachelcmc10 for 10% off !)

OTHER:

Visible Image stamp set - believe in unicorns
distress oxides- peacock feathers, fossilised amber, picked raspberry, abandoned coral

versafine onyx black
stazon jet black
spectrum noir sparkle pen -clear
watercolour cardstock
black cardstock
card blank
prima color bloom spray- soft teal
fineliner


Hopefully I will feel a lot more chipper by the time I upload my next make, but hope that you enjoyed this one, and let me know which you love more- Fairies or unicorns!


Monday 1 April 2019

Sparkly fairy card

Sparkles, Fairies and coordinating envelopes.


There was only two stamps so far from the ‘sealed with a kiss’ stamp set from Chunky Monkey Crafts, one of them being the ‘delivered by fairies’ stamp... when making this sparkly fairy card with a distress ink background, I thought it would be a perfect finishing touch for the envelope!

I can’t resist a bit of sparkle, and I love getting out my spectrum noir sparkle pens. The hard bit is knowing when to stop... in a perfect world it would be used all over everything 😂


This project has a tutorial video available too! please do let me know if you enjoy watching, and I will create more of them!


and here is some pictures of the finished card with it's coordinating envelope ! 


The distress ink colours I chose remind me of a sunset- perfect for the silhouette of a fairy sat on a branch.
sparkly fairy card- crafters companion enchanted woodland - Rachel Gillham Art


sparkly fairy card- crafters companion enchanted woodland - Rachel Gillham Art

This project was not without its issues... my laptop died a sudden death, and Blogger is not the easiest from an Ipad!

therefore- this project is extremely late being blogged, but it did give me time to edit and upload the 'making of' video on youtube... silver linings, and all that. 


Supplies
Chunky monkey crafts ‘sealed with a kiss’ stamp set ( 10% off using code rachelcmc10)

Other

Crafters companion enchanted forest ‘shine bright’ stamp and die set
Distress inks
Spectrum noir sparkle pen clear
Double sided tape
Watercolour cardstock
Black cardstock
A6 card blank

Tuesday 19 March 2019

One Sheet Wonder Cards- and a friend to the RESCUE!

or a tale of how Rachel failed... AMAZINGLY!


I have always liked to try new things, and I have known about the existence of one sheet wonder cards since I very first started creating cards. 

For those of you that don't know what I'm talking about, 'one sheet wonder' cards are where you use one piece of decorative paper to make multiple cards- with no waste!

there are lots of tutorials out there, and lots of different results, so it makes it easy!

I highly suggest choosing a paper that is double sided, because then you have even more possibilities!

now... here's the FAIL part of my OSW creating....

I found an amazing tutorial, and really liked the look of how she divided the sheet of paper. The tutorial didn't go into card blank size, so even though the tutorial was in inches, I totally forgot that American Greetings cards are usually a different size to those in the uk! 

so I had all my paper cut, and when it got to assembling, there was a big UH OH! followed by a few expletives, as I realised even though I could solve the card blank issue by making my own (which is something I do regularly anyway), I wouldn't have any envelopes to fit them!

Luckily, one of my very best friends, and a fellow creative who lives in the USA came to the rescue, and posted me some envelopes so I could complete the set.

this is the reason that even though the cards were completed quite a while ago, and I'd shown you some sneak peeks over on my Facebook page, the finished project didn't appear!


thank you so much  Lina for saving the day! (if you want to check out her blog, she makes amazing quilts and is a fantastic colourist too!)


The tutorial I followed, by the way is THIS ONE that I found on BluPrint.


One Sheet Wonder cards Rachel Gillham Art www.bigcraftymess.blogspot.com
One Sheet Wonder cards are a fantastically easy way to make a lot of cards, quickly! 

One Sheet Wonder cards Rachel Gillham Art www.bigcraftymess.blogspot.com
This set was totally inspired by the Chunky Monkey Crafts 'sealed with a kiss' stamp set- Not only did I want to stamp the envelopes, but I wanted to think outside the box too- I used the stamps in the set on the front of four out of the 14 cards too - masking off the words I didn't need!

One Sheet Wonder cards Rachel Gillham Art www.bigcraftymess.blogspot.com
Here is the entire set- I used some layout ideas from the original tutorial, but also changed the designs and layouts a bit , to suit my own purposes. All the stamp sets used I will list below, and all images on the cards have been hand drawn, and painted with watercolours (with the exception of the second card on the second row, where I drew flowers directly onto the paper)
One Sheet Wonder cards Rachel Gillham Art www.bigcraftymess.blogspot.com
and here is the stamped envelopes to go with the cards! I used all but two of the stamps in the set to stamp on the envelope flaps. 


SUPPLIES


Chunky Monkey Crafts 'Sealed With A Kiss' stamp set (use code rachelcmc10 for 10% off your order)


OTHER


staedtler triplus fineliner

Nuvo Dots in Dandelion Yellow

 and Carribean Ocean

Visible Image Stamp 'just be happy' from Tomorrow Doesn't Exist stamp set

Stamps from Some Odd Girl ' Everyday Smiles' clear stamp set (retired)

teal cardstock from Papermill direct

12x12 cardstock 

double sided DSP

sequins

Sizzix dies


I hope you have enjoyed seeing these cards, and will possibly give OSW cards a go yourself!


** This blog post contains affiliate links- they will not charge you extra when you shop through the links, but earn me a little revenue so I can keep creating and sharing projects with you all!

Tuesday 12 March 2019

Snail Mail Art

Snail Mail art with a Chunky Monkey Crafts Stamp

I'm pretty much a chronic insomniac, and I love to watch youtube and trawl pinterest for inspiration and tutorials when I can't sleep.. and apparently envelope, or snail mail art is a thing.... not that I've EVER received a decorated envelope, or done more than a couple of little doodles on one myself!

Therefore, I decided it would be a fun idea, and once I picked the 'party in an envelope' stamp to work with, I came up with the idea of illustrating a monster party theme on my envelope (which is a  c6 size envelope over here in the UK) 


I originally sketched my doodles on lightly in pencil, inked over them in fineliner, and once dry, erased the pencil. I then coloured in my doodles in coloured pencils, making sure to leave a large enough blank space within the banner to add a name and address, which could either be stamped with individual letter stamps, or hand lettered.


I used a green ink pad to stamp the 'party in an envelope' across the flap, where I'd doodled a banner.

This was a really inexpensive and fun way of jazzing up a plain paper envelope, and because my handwriting is ABYSMAL the CMC stamps were definitely handy in pulling the idea together!


SUPPLIES USED

CMC 'Sealed With Love A6 stamp set (use code rachelcmc10 for 10% off)

OTHER:
white c6 envelope
tombow brush calligraphy pen
Spectrum Noir Colorista Pencils
Avery Elle Ink Pad in 'Jungle'


Tuesday 5 March 2019

sepia colouring with alcohol markers and stamping


sepia colouring with alcohol markers and stamping #rachelgillhamart #chunkymonkeycrafts #copics #stamping #ccdesigns


Sepia Colouring, and Envelope Stamping

Today I’m up with a project for Chunky Monkey Crafts again! I always love to show off the gorgeous stamps on the envelopes, but love to create a project to go with them too!
This time, I have used ‘ made with love’ as a stamp on the back of my card, and ‘warning, opening will induce a smile’ on my envelope flap.

The card I created to go with the stamps is an idea I had recently- it is a technique I also plan on videoing for you in the near future, so please stay tuned for that!


I bought a sepia ink pad from versafine, and wanted to do a play on no lines colouring- many moons ago I coloured a stamp with only my ‘E’ copic markers, but I did it with black lines, and they looked ok, but it could have been better. When my sepia pad arrived, I knew I wanted to give the technique a go again, with the C.C designs rubber stamp ‘ latte kikki la rue’, as a play on the fact she was holding a coffee cup, and coffee is well, brown. (especially the way I drink it!)

I also decided to inject a tiny pop of colour with the red heart on the coffee cup, and the sparkly red hearts I used as embellishments. These I die cut using a little MFT stamps planner die set which includes a heart, coloured with the same copic marker I used for the heart on the coffee cup, and added sparkle with a spectrum noir sparkle pen, and finally a highlight using a white gel pen.


I love to ‘ground’ my images so in the same colours I used for the image, I created her a little patch of ground to stand on.
Because I was keeping this cas with a lot of white space, I finished with a simple doodled border and matted onto kraft cardstock. I was toying with adding a sentiment to the card, but I loved the look of so much white space, and having the only stamped wording being the awesome stamps from CMC!


Don’t forget that you can get any of the Chunky Monkey Crafts stamps from their WEBSITE at 10% off using code ‘rachelcmc10’  while they are available! 


see you soon!


Sunday 3 March 2019

A mixed media feather tag

A mixed media feather tag- Rachel Gillham Art

A mixed Media feather Tag with Visible Image Stamps and a Samantha K crafts mdf feather


I've been really into creating tags recently- I was at a car boot sale a while ago, and there was someone selling off huge piles of crafty goodies, including a huge amount of the Ranger Manilla tags- suffice to say, I now have enough of them to last me a really long time! they are such a great size to work with, and I really enjoy them.

feather mixed media tag- rachel gillham art

I dug into my Samantha K pile when creating the Jillibean Mixed media star, and rediscovered the feathers I had bought at the same time- so it was only a matter of time before I dug back into the bag to work with one of them!

I gessoed the whole tag, before adding some vintagey papers in random areas, added a quick layer of gesso again,  and then I stamped feathers from the Visible Image 'angels are near' stamp set on top, in versamark ink. 
I then grabbed some stencils and white texture paste, and added that to random areas of the tag. 


once dry, I went in with distress oxides Fossilised Amber and Peacock feathers , which I blended together.
I also used a basic letter and numbers stencil borrowed off the children, which I pounced some ink through, once the oxides were dry. 

to grunge the tag up a little i added some vintage photo and rusty hinge distress ink around the edges.

for an additional layer, I sprayed dylusions ink sprays on top in Lemon Zest and Cut Grass, before adding my feather.

while waiting for the main tag to dry, i had also coated the feather in gesso, then added the same distress inks used on the background to it.

to finish the tag off, I stamped and cut out the sentiment from the stamp set (masking the words off so I could cut them out seperately) and coated them with a layer of vintage photo distress ink. 

I used gold gilding wax on various areas, and antiqued some lace also with the vintage photo ink pad- this I attatched by pulling both pieces through the hole and stapling them in place.


I hope you've enjoyed seeing the process! I really hope to be able to start videoing my makes again soon- I'm in the process of sorting out a room to use as my own work area!

I currently share a table with my husband and two children, so my own space will be a total blessing.


Saturday 2 March 2019

keeping the candy coming!

keeping the candy coming- Rachel Gillham Art - a sweet CAS greetings cards using Jillibean Soup's Sweet Moments clear stamp set


Sweet Moments - Jillibean Soup

I really couldn't get enough of the 'sweet treat' stamp set by Jillibean, so when I got the chance to grab the 'sweet moments' set, I took it and ran with it!

I thought it would be great fun to make a distress oxides background, so I grabbed Abandoned Coral and Picked Raspberry. A little blending, and some water, and I ended up with a beautiful background- I chose to diecut my favourite part out and make that the base for my stamped and coloured candy.

greetings card with Sweet Moments clear stamp set by Jillibean Soup- Rachel Gillham Art

I could have used the solid stamps, but I really do love to do a little colouring- instead of reaching for my alcohol markers, I decided to grab my distress markers and a watercolour brush instead.

I stamped lots of the sweeties , and cut them out on my scan n cut, before arranging them in a circle on top of the background I made. once happy with their placement, I added some sparkle with my Spectrum Noir clear sparkle pen, and glued them down.

the next thing was the sentiment, and as I really didn't want to lose any of the stamped images, by covering them with cardstock, I stamped and heat embossed the sentiment onto vellum, and stuck that down too. I 'hid' the glue with some little drops of Nuvo Drops in my favourite colours!

to make my distress oxide background really pop, i put a layer of black behind it. I think it really works and looks effective to add a pp of a dark colour in to really make the brights stand out.


I also LOVE the big white border all around the main card design- I used to struggle a lot with white space, but I'm starting to love it more and more!

This card has made me crave something sweet, so I'm off to raid the kids sweetie stash... shhh don't tell them!


Friday 1 March 2019

A sweet little bundle of cards made using Jillibean Soup clear stamps!

three card ideas using jillibean soup stamps -rachel gillham art

Three Ideas for Cards made with Jillibean Soup Clear Stamp sets

'sweet treat' and 'lemonade' 

Spring is definitely on the way, and I was feeling cheered up by the sudden appearance of the sun!

when I feel EXTRA cheerful, I love to make happy, pretty things, and my stamp sets from Jillibean soup are definitely happy and pretty- and hopefully the recipients of the card will be made happy when they see them, too!

I was also extra happy, because I could only fit five skittles into my sweet treat shaker card so that they still had room to move.... the rest became a snack whilst I was crafting!

I also think the first card would make a wonderful accompaniment to the treat box that I made in THIS blog post a few days ago.

I do like shaker cards that are CAS - the shaker to me is one of the main elements, so I kept a lot of white space.
Jillibean make it so easy by producing the shaker elements AND cards they fit into, too - I have the shaker elements, but it was a little hard for me to find the cards here in the uk, so I guestimated the right size hole, and cut it on my cameo onto the right sized piece of card.

i used a strip of washi along the left edge, cut some banners and stamped the sentiment onto the white one - mixing the way I cut the ends to keep it fun, and finished by using a little twine and some nuvo dots.

because I chose to back it in blue, I popped the whole top layer of the card up on 3d foam pads so that you could get to the skittles if you were feeling desperate for some sugar!


The second card I made purely because I had a good laugh at the sentiment stamps, and thought they would make some of my friends giggle too! It is a perfect way of making the usual 'make lemonade' saying a touch more grown up!
this too was a fairly easy layout, using some bright fun papers (the top one is the Jillibean soup 12x12 sheet that has appeared in a few projects recently- it was one I loved so much I tried to have as little waste from it as possible!)
that I layered on top of yellow cardstock with a diecut scalloped edging (sizzix die from Stampin up)

 again, I used some twine , because - well. I like twine!

the awesome jar from the set was stamped, coloured with alcohol markers, and cut out , before stamping and heat embossing the lemon slices- which i also added glossy accents to.
I also popped those up on 3d foam pads for some extra dimension, and to put them at the same height as the sentiment, which I also popped onto 3d foam pads.

a few more epoxy dots, and voila...  a card to cheer up someone feeling in need of some sunshine and giggles!


The third and final card I made using a different approach-
instead of white space, I decided to remove a whole chunk of the front instead!

that way, I could split the sentiment (which never fear, are already separate stamps )
between the outside and the inside, still see both, and also create a more unusual card, where the lemonade jar was really the main focus!

(and yes, more of that same sheet of paper)

both the lemonade jar and the lid are popped up on 3d foam pads, but this time the heat embossed lemon slices were heat embossed directly onto the cardstock, before I coloured the lemonade using my copics


so there we go- three pretty simple cards to make that don't lack fun, and brightness to cheer up even the most gloomy day (and the first may even make up for a birthday age that wasn't being too looked forward to, either!)

I do hope you enjoyed seeing what I did with these cards, and that it inspires you to have a go with these stamp sets too!


Thursday 28 February 2019

A cute Boy's Scrapbook page- with a tag pocket!

A cute Boy's Scrapbook page- with a tag pocket! using fun papers, brightly coloured ribbon, stickers, diecuts and tags, create a wonderful boy's scrapbook page!

Making a fun boy's scrapbook page with removable journalling tags!


This is my second ever scrapbook page, and I decided to get adventurous with it. I really wanted to use the colours yellow, navy and grey, with a pop of red (simply because that is my son's favourite colour!)
I found the back piece of designer paper at My Little Magpie some time ago, and as I had some other projects on the go that utilised the Jillibean Soup paper, and a little left over, I thought that would be perfect to make the tag pocket with!

boy's scrapbook page with removable journalling tags  - Rachel Gillham Art

I decided to keep the photo mat fairly simple, with a thin border of grey and white, because the page was already quite busy! once I was happy with the photo placement, I cut an absolute TONNE of little arrows out from a sizzix thinlets set I have. the little hearts are part of the set, so I dotted those between the arrows too. it is a little hard to see from the photo, but I popped the hearts up on 3d foam pads for some added dimension.


In the bottom left, I used the Jillibean Soup '<3 you' cut file which I cut in two colours- pink and white. I inked the edges and added some gel pen highlights to the heart too.
there really are some amazing cut files from Jillibean, something for everyone, and every occasion which can be found in their spot in the silhouette store

The tag pocket in the right hand corner is really simple-  I just worked out how big I wanted it to be, trimmed the paper in my paper trimmer, and made sure only to tape two sides! 
I do love that arrow paper, and I'm really sad I have used it all now... but also happy to have created some amazing things with it too!

The tags are from my vast collection- the larger ones are from Ranger, and the bottom one is a simple luggage tag I think I picked up from my post office. These got inked, and ribbon threaded through them. I also added some splats of picket fence distress stain on both the tags and the papers, because...why not?

I finished with some banners in the top two corners and some trusty Nuvo Drops following my colour scheme.

My son absolutely loves this page (he's nine now, almost as tall as me, and loves looking at photos from when he was small) and I feel pretty happy with it too!

I'd love to know your thoughts on it as well!


until next time,


Wednesday 27 February 2019

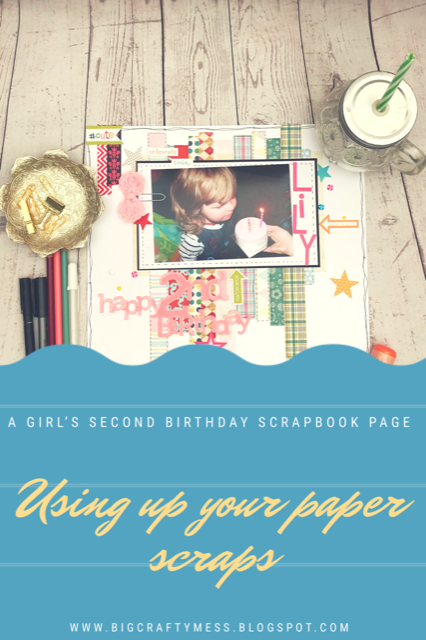
A second Birthday Scrapbooking Page - using up paper scraps

A second Birthday Scrapbooking Page - using up paper scraps- Rachel Gillham Art

A scrapbooking page that uses up your paper scraps- Rachel Gillham Art

A scrapbooking page using up paper scraps!

If you have been crafting for a few year like me, I bet you have a nice big pile of paper odds and ends. What better way to use them than incorporating strips of your favourites on a scrapbook page?

this is my very first scrapbook page, so I wanted to start off with a lot of white space- I got a lot more adventurous on my second one (stay tuned as that will be in another blog post soon!)


quite simply- I cut strips from the papers that caught my eye, making them different lengths, and stuck them down over the top of a rectangle of oatmeal coloured paper- leaving the edges of that piece visible. I doodled faux stitching and some solid lines round the edges of the strips- I love a good doodle! created a photo matt and faux stitched around that too, before adding the photo of my daughter blowing out the candles on her second birthday cake.
i added a hand doodled frame around the edge, and some of my favourite washi tape at the corners.

I also added some fun stickers, and some dot embellishments, along with a crocheted bow that I found in my embellies box.

to really finish the page off, I used one of the Jillibean Soup Cut Files 'Happy 2nd Birthday' cut in a pale pink cardstock  below the photo, which I added a layer of glossy accents to. it made it really sparkly and shiny!

I hope you liked my first ever attempt at scrapbooking- I had great fun!


Most recent post

mailing stickers!

A quick, easy project, to funk up your mailers! if you've been following this blog, you will have seen me using the Chunky Monkey C...